• Home
    • Agave
    • Flora
    • Butterflies 1
    • Butterflies 2
  • Workshops
  • Blog
  • Contact
Menu

LAJphotos

Photographing the beauty of the Southwest garden one agave stalk at a time...
  • Home
  • Galleries
    • Agave
    • Flora
    • Butterflies 1
    • Butterflies 2
  • Workshops
  • Blog
  • Contact
×

Gardenography by LAJphotos Blog

ORC-Gold-250w.png

One Room Challenge: Week 6 - Cactilicious Kitchen REVEAL

Lori A. Johnson November 27, 2020

Finally, it’s my Cactilicious Kitchen reveal! The six weeks of the One Room Challenge™ flew by, and while a few things remain to be finished at a later date, my extreme budget kitchen makeover more than lived up to my expectations. The centerpiece and color inspiration for everything else is my custom pop art cactus blossom wall mural. Cactilicious, indeed!

I created this custom pop art wall mural based on my own photo to spruce up this tiny galley kitchen!

I created this custom pop art wall mural based on my own photo to spruce up this tiny galley kitchen!

If you recall from Week One, I originally intended to use a commercially available wallpaper, but for various reasons, was never quite satisfied with any particular design. It had to somehow account for the existing black countertops and appliances, as well as the terracotta tile floors, but also bring in cactus blossoms in a bold way. There were a lot I liked, but none felt right, so I decided to create my own custom wallpaper based on one of my own original photos and my pop art mural was born.

I shared more details about how I created the mural in Week Four’s post, but I knew my friends at Image Craft would be able to make my file come to life. They recommended Photo Tex peel and stick for the media and not only printed it on their state-of-the-art large format printers, but also installed it for me after I chickened out on making the cuts around countertops and cabinets. I’m so glad I had their expert installers do it, as the application is precise and flawless – and unlike if I’d tried it myself, there was no cursing involved!

Space where the wine fridge used to be has a temporary solution!

Space where the wine fridge used to be has a temporary solution!

If you read my prior posts, you know I had originally intended to add a new base cabinet to fill in the space where my old wine fridge was, then repair the missing tile in front of it. Well, it turns out the handyman that helped me with the ceiling fixture back in September tested positive for COVID last week right before he was due to help me with cabinet installation, so I filled in the space with a temporary solution until he sufficiently recovers. On Amazon I found a black 24” x 36” silicone dog feeding mat, of all things, that fit perfectly inside the space to cover the concrete floor, then I hid the broken tile just outside the space with a black anti-fatigue mat I found at Walmart for under $14 (they are significantly higher everywhere else). Once the tile is finally replaced, I can move the mat to the sink area. At Home Depot, I found a basic black kitchen trash can with lid to slide underneath, then decided to stick on one of the wallpaper samples I had received from Spoonflower to spruce it up just a hair.

Luckily, everything else went according to plan, including the tedious job of painting cabinets, which I outlined in a previous post. Follow me on Instagram (@LAJphotos) for further updates and be sure to check out my “ORC” Highlight for more on the project. Meanwhile, see individual photo captions below for more information and a list of sources at the end.

I made a few custom items at Zazzle, including this kitchen towel!

I made a few custom items at Zazzle, including this kitchen towel!

Coordinating mug, also from Zazzle!

Coordinating mug, also from Zazzle!

Fridge magnets from Zazzle - larger one doubles as a whiteboard!

Fridge magnets from Zazzle - larger one doubles as a whiteboard!

Mixtiles from my own agave photos stick to the wall without damage.

Mixtiles from my own agave photos stick to the wall without damage.

Cute face pot by my friend and ceramic artist, Deborah Robin. Mosaic tray is vintage.

Cute face pot by my friend and ceramic artist, Deborah Robin. Mosaic tray is vintage.

Sink side overview - peel and stick backsplash tile went on easily.

Sink side overview - peel and stick backsplash tile went on easily.

Sink side looking towards the wall mural. There’s an exit at each end.

Sink side looking towards the wall mural. There’s an exit at each end.

Cactus mason jars from a dollar store; I added pump lids and filled with soap (lotion is really hand sanitizer, but the labels came with the lids, so I played along). Cactus dish by Sandy Siegel.

Cactus mason jars from a dollar store; I added pump lids and filled with soap (lotion is really hand sanitizer, but the labels came with the lids, so I played along). Cactus dish by Sandy Siegel.

Arizona cutting board and cactus pitcher from Amazon, shot glasses from Tuesday Morning, and Arizona iced tea from the grocery store!

Arizona cutting board and cactus pitcher from Amazon, shot glasses from Tuesday Morning, and Arizona iced tea from the grocery store!

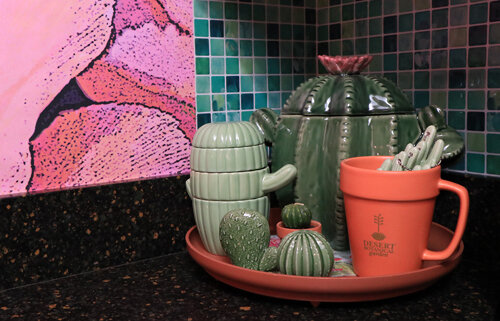
I used a rotating tray meant for turning heavy pots as a lazy Susan and added a cactus cookie jar from World Market; cactus measuring cups, measuring spoons, and salt & pepper shakers from Amazon. Mug is from Desert Botanical Garden gift shop.

I used a rotating tray meant for turning heavy pots as a lazy Susan and added a cactus cookie jar from World Market; cactus measuring cups, measuring spoons, and salt & pepper shakers from Amazon. Mug is from Desert Botanical Garden gift shop.

A few additional sources:

  • Face pot by Deborah Robin

  • Vintage mosaic tray from Soda Pop Vintage

  • My own stick-on photo tiles from Mixtiles

  • My Zazzle store (more products to be added)

  • Small cactus ring dish by Sandy Siegel

  • Desert Botanical Garden gift shop terracotta mug

  • Ecoart peel & stick tile backsplash

  • Black cabinet pulls

  • Cactus cabinet knobs

  • Cabinet paint colors: Valspar satin finish from Lowe’s, “Coral Peach” 2005-4B (upper) and “Elf” 6002-8B (lower)

 I’ll leave you with this “Before” photo as a reminder of where it all began!

Baby poop brown walls and melamine cabinets had to go!

Baby poop brown walls and melamine cabinets had to go!


In Cactilicious Kitchen, One Room Challenge Tags Cactilicious Kitchen, One Room Challenge, #oneroomchallenge, Better Homes and Gardens, #bhgorc
ORC-Gold-250w.png

One Room Challenge: Week 5 - Paint and More Paint!

Lori A. Johnson November 8, 2020

It’s Week Five of the One Room Challenge™ and the pressure is on! More happened behind the scenes than in front of the camera this week, but the great news is that everything I was waiting for has now arrived, and all systems are go for this coming week! The lone base cabinet I ordered a month ago from Home Depot arrived a week early, though I’m a little nervous about unboxing it and making sure it inserts easily into the space where the wine fridge used to be.

More importantly, I picked up my final paint colors from Lowe’s and actually started painting the upper cabinets and the small sections of wall that won’t be covered by the wallpaper mural I sneak peeked in last week’s post. I always knew the lower cabinets would be green, so after comparing a billion paint chips to the green in the mural - not so much to match, but to complement – I chose the Valspar color “Elf”, but mixed into Lowe’s exclusive Sherwin-Williams HGTV Home base paint instead of Valspar’s.

Prepped and primed with Kilz Adhesion primer for slick surfaces.

Prepped and primed with Kilz Adhesion primer for slick surfaces.

For the upper cabinets and walls, I solicited the help of my Instagram followers to help me decide between pink and peach, either of which would complement my wall mural. Though I strongly favored pink, my poll ended up 32% for pink and 68% for peach. After thinking it over and comparing various paint chips to the mural once again in an attempt to further justify pink, I decided to go with peach for several reasons of my own (poll results notwithstanding)!

Walls and upper cabinets getting a coat of “Coral Peach”.

Walls and upper cabinets getting a coat of “Coral Peach”.

First, the peach also complements the tiny flowers in the tiny tiles that make up the peel and stick tiles I chose for the backsplash. Second, there’s enough pink in the mural to dominate the color scheme already, so now I can justify adding pink accessories without it being overkill in the pink department. Third, with peach isolated to the kitchen, I can then go full tilt toward pink (and green… and purple…) in the adjacent dining/living area, whose kitchen doorway will nicely frame the mural from the outside looking in. Thus, the final result was the Valspar color “Coral Peach”.

Squint to see the tiny peach accents in the tiny peel and stick tiles!

Squint to see the tiny peach accents in the tiny peel and stick tiles!

I then set to work prepping and painting the frame of the upper cabinets, first by cleaning thoroughly with Krud Kutter Gloss-Off, which helps degloss the melamine surface for better paint adhesion. Then I primed with two coats of Kilz Adhesion, followed by two coats of peach paint. Even though it was nearing 11pm by the time that was done, I powered through and finished adding a second coat to all the small walls so I could toss the used tray and roller in the trash and never look at it again! Well, at least until tomorrow, when I start on the upper doors….

Ugh, I’m so over you!! Go away and don’t come back - until tomorrow…

Ugh, I’m so over you!! Go away and don’t come back - until tomorrow…

Upper cabinet doors are ready to paint - I’m over it before I begin!

Upper cabinet doors are ready to paint - I’m over it before I begin!

Speaking of the doors, the drilling of holes for handles was a success! I was a little nervous about the melamine surface shattering, but as you can see, the outside holes in front ended up perfect, and only the inside holes shattered a tiny bit, which will be easily covered by the handle screws.

Turns out you can drill holes in melamine - but carefully!

Turns out you can drill holes in melamine - but carefully!

Plans for this final week include: 

  • Priming, then painting the upper doors peach (I’ve already lightly sanded and deglossed)

  • Attaching handles and replacing doors once fully dried

  • Starting all over with removing, prepping and painting the lower cabinets/drawers green

  • Painting, installing a trash bin pull-out mechanism, then inserting the new base cabinet

  • Repairing the tile in front of the new cabinet

  • Installing the wallpaper mural

Wow, that’s a lot – will I get it all done in time for the final of six blog posts next week? Luckily, given the current pandemic situation and the delays in getting supplies, the ORC team has extended the final deadline to November 29th, but I want to be done well before then. We shall see….

In Cactilicious Kitchen, One Room Challenge Tags #bhgorc, #oneroomchallenge, One Room Challenge, Cactilicious Kitchen, painting melamine
ORC-Gold-250w.png

One Room Challenge: Week 4 - Cactilicious Color!

Lori A. Johnson October 30, 2020

This week’s One Room Challenge™ update is all about Cactilicious Kitchen color! Thanks to Image Craft and their speedy service, I was able to pick up my custom pop-art wallpaper mural yesterday and it’s exactly what I hoped it would be - which may be a little wild to unsuspecting bystanders who were expecting something a little more restrained! Here’s a speak peek of one tiny section:

Pop-art cactus blossoms mural sneak peek!!

Pop-art cactus blossoms mural sneak peek!!

I started with a photograph, but I needed to incorporate all my colors to tie all the kitchen elements together - my black countertops and terracotta tile floors, which I could not change, plus green (because cactus, duh), and either peach or pink cactus blossoms (because COLOR!). However, despite the thousands upon thousands of cactus blossom images in my archives, none were going to cover all the bases, so I made my own. Not only that, I wanted it to be more abstract, rather than a straight-up large photo plastered to the wall.

First, I had to choose an image that could be cropped to a near square to cover an 80”H x 84”W wall, then I experimented with several of the artsy filters built into Photoshop Elements. After I settled on one or more (I’m not entirely sure now!), I then embarked on a series of color manipulations by adjusting the hue in individually selected areas over the entire image. The flowers started out pink, but I wanted to add in some more orange/peach tones in the highlight areas to tie in the terracotta floor tile. I played with the file for around two hours before I was satisfied with the result. Then I sent it to the fine folks at Image Craft, and voilà - a custom pop-art peel and stick wallpaper mural!

I’d be remiss if I didn’t throw in an extra shout-out to Image Craft here in Phoenix for the excellent quality and service. As the Southwest’s premier large format graphics printer, they service customers nationwide with a huge variety of products, from 3D acrylic letters cut out via CNC router to billboards, vehicle graphics, wall graphics, signage, and much more. They even reproduce fine art by making custom inkjet prints on a variety of substrates in any size you can imagine. Many internationally known photographers have their exhibition images both printed and framed at Image Craft - in fact, the company got its start by processing film in owner Doug Olson’s garage!

Image Craft’s lobby in Phoenix, AZ - when they say “Any Image. Any Size. Anywhere.” they are not kidding!

Image Craft’s lobby in Phoenix, AZ - when they say “Any Image. Any Size. Anywhere.” they are not kidding!

Now that the mural’s in my possession, my Cactilicious Kitchen plans for this next week include choosing a paint color from my mural for the upper cabinets (and what remains of the walls) and then actually painting said cabinets. This past week, I removed all the doors and drilled handle holes in preparation. Because they’re melamine, I’m priming with Kilz Adhesion primer, first, then painting and possibly finishing off with a coat of Minwax Polycrylic. If anyone has any tips for painting melamine, or even a cautionary tale, please drop it in the comments or DM me over at Instagram at @LAJphotos. In fact, head on over to my IG Stories and cast your vote for the cabinet/wall color!

A little teaser for where I’m headed with accessories…. I’ll list all my sources in the final post!

A little teaser for where I’m headed with accessories…. I’ll list all my sources in the final post!

In Cactilicious Kitchen, One Room Challenge Tags Cactilicious Kitchen, One Room Challenge, wall mural
ORC-Gold-250w.png

One Room Challenge: Week 3 - Finalizing Color Scheme

Lori A. Johnson October 22, 2020

Here we are in Week Three of the One Room Challenge™ and, while I haven’t made a lot of progress from last as far as manual labor goes, I have done quite a bit of mental labor and am finalizing the materials and color scheme for my Cactilicious Kitchen makeover. As I mentioned in last week’s post, I diverted from a commercially available wallpaper pattern to a custom mural based on one of my own photographs. The whole premise of this makeover is to use my own photos as decor wherever possible, so it just didn’t make sense to use someone’s else’s design on the wallpaper.

A moody little mood board for your consideration!

A moody little mood board for your consideration!

I’ve cobbled together a little mood board of sorts consisting of a few color samples atop the lone floor tile I found in the garage that will fill in the destruction of the floor that resulted from pulling out the wine fridge. Speaking of which, I decided to go ahead and fill the space with a stock cabinet from Home Depot, but it’s not due to arrive for a few weeks, so I’ll have to work around it for now. The smaller green cactus tiles are for the peel and stick backsplash, for which I listed the source in my Week One blog post (below).

Since the countertops are black, I’m bringing in black cabinet hardware, and although it’s very difficult to see from this partial low-res mural sample I printed at home, there is black running between all of the individual cactus blossoms, as well as peachy tones pulled from the terracotta tiles highlighting the pink petals (and, of course, some green as a nod to the cactus tiles!). You can see the brighter colors in the sample cabinet knob I had printed at Zazzle, which I may or may not use in some capacity. I did order a few other coordinating odds and ends from Zazzle and elsewhere that have not yet arrived.

As for paint colors, you can see the strips of green color chips from which I will choose a shade for the lower cabinets. For the upper cabinets, and the remaining bits of wall not covered by the mural, I will pull one of the warm pink colors shown here from the mural once it’s printed for a more precise color match.

Once I’m nearer to completion, I’ll list ALL the colors I ended up choosing by brand and name, as well as all of the sources for every last thing down to the Zazzle knob! Meanwhile, check out my Instagram “ORC” Highlights from Stories (@LAJphotos) for additional details as they’re finalized!

In Cactilicious Kitchen, One Room Challenge Tags Cactilicious Kitchen, kitchen makeover, #bhgorc, #oneroomchallenge, One Room Challenge, Better Homes and Gardens, Gardenography by LAJphotos
LAJ Photography_06.jpg

Welcome to my blog, “Gardenography by LAJphotos”! I’m Lori A. Johnson, a nature photographer and freelance garden writer based in Phoenix, AZ.

PHGcover.jpg